With Preview 4, Adobe has added several new features that make it even easier
Easier Puppet Tagging
Up until now, users had to name a character’s Photoshop or Illustrator layers a certain way to work within Character Animator. By naming a layer “left pupil,” you could control the movement of that layer with your own left pupil in a webcam. But remembering all of these canonical names made artwork preparation a bit more tedious.
With Character Animator Preview 4, you don’t have to worry about naming your layers anymore. Within Character Animator, you can select any layer and tag it appropriately using the new visual or text-based tags panel. For example, if I want Layer 42 to be my right eyebrow, I can tag the right eyebrow using the example face in the new tagging panel. If I want to experiment with some different mouth shapes or head turn positions, I can quickly tag and untag layers to view the results.
For those of you still wanting to name your original artwork layers with the canonical names, that’s fine – they’ll come in with the appropriate tag automatically applied. You can easily switch between visual or text-based tags at any time.

New Realistic Behaviors
Behaviors are extra functionality sets that can be applied to characters (such as head turning and breathing), and Preview 4 adds some useful options to add depth to your creations.
Motion Trigger allows you to switch between different views based on the direction a character or part is moving. For example, as a character moves to the right, you can switch to a profile view of the character running with motion trails behind it.
The movement of the character can either be direct (you dragging it across the scene) or indirect (a motion effect attached to a hand on an arm that swings because the torso is moving).
Auto Blink automatically triggers a layer, such as eyelids that blink or lights that you want to flicker. The blinking can occur at regular intervals or with some randomness. You can use this behavior to have a character blink randomly, but it can work in combination with the Face and Keyboard Triggers behaviors if you also want to control blinks with the webcam or key presses.
Both of these behaviors combine extremely well with other behaviors. For example, the existing Cycle Layers behavior allows for frame-by-frame animation– just put your sequential frames in a group. So dragging a character with Motion Trigger left or right might also trigger a 12-frame walk cycle animation. Or auto-blinking could randomly trigger a robot’s multi-frame blink animation, glowing buttons, or steam shooting from a gasket. It’s pretty impressive how much expressiveness and personality you can add to your characters with just a few clicks.
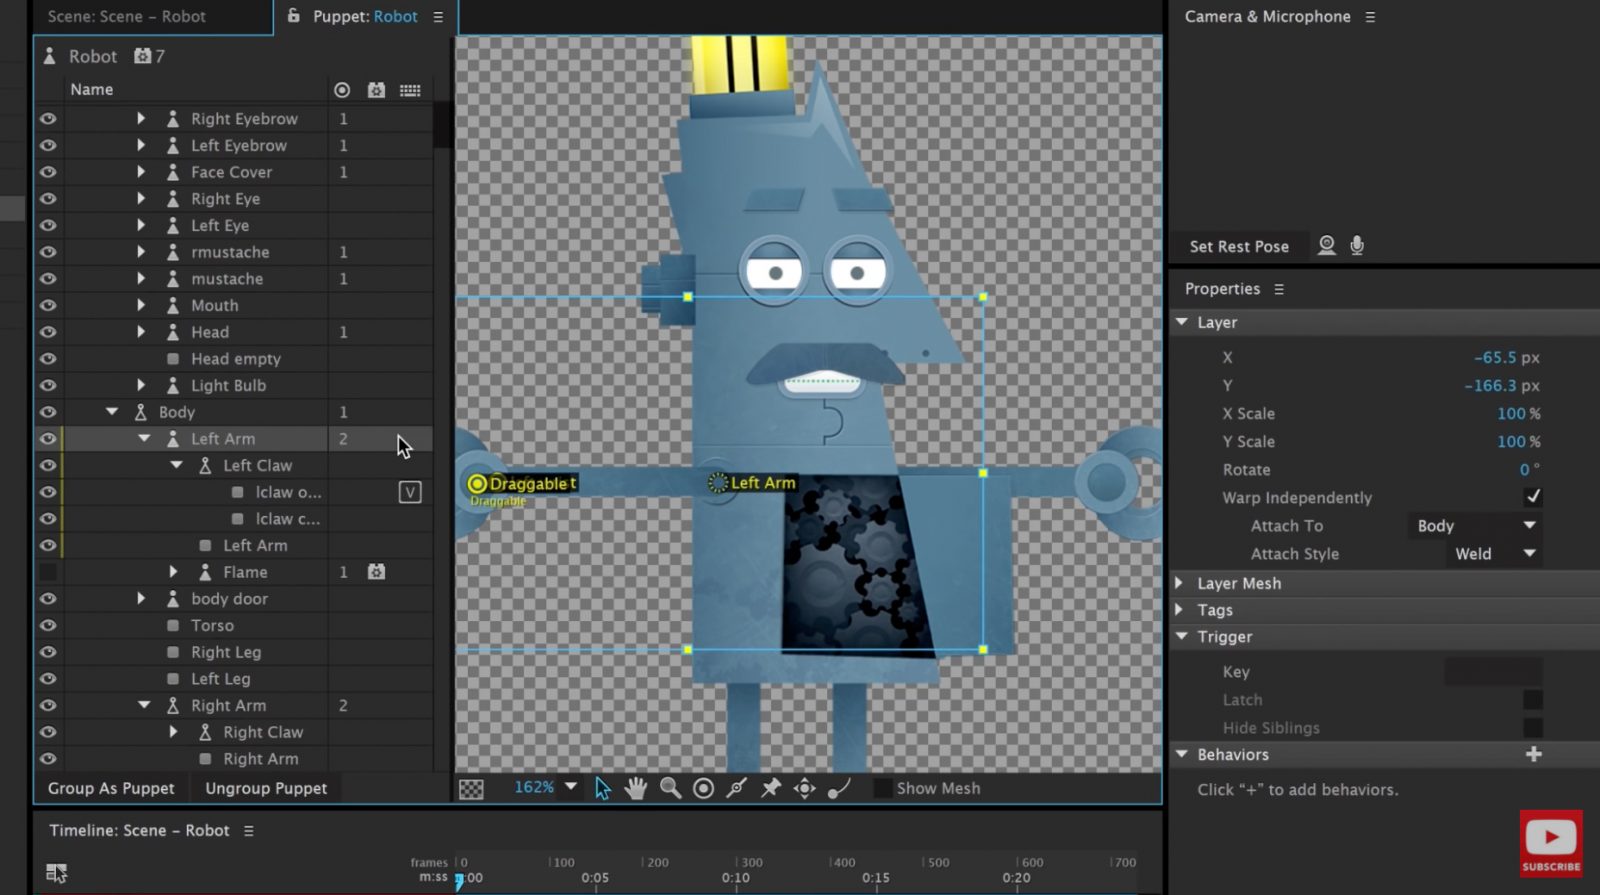
- Attach styles: Choose how parts connect to each other such as welded like metal, hinged like a door, or free to fly around on their own.
- Draggable take groups: Now every hand, foot, tail, or limb you drag will automatically get its own track in the timeline – making it significantly easier to get that perfect performance.
- Face smoothing: Crank up this new facial feature to reduce any jitter or jumping as you move your face around.
- Eyeball toggles: Every individual behavior and track can now be turned on or off.
- Playback speed: Adding to slow-motion recording, you can now play your performances back at slower speeds to make sure every frame looks great.
- Improved lip sync and new visemes: The automatic lip sync has been refined to give more mouth shape options and more accurate output.
- Staple tool: Staple separate parts of a puppet together to quickly connect them.
Export for Live Animation (and with Adobe Media Encoder)
Realtime live animation enables a live feed to be fed over the air via any Syphon client. Character Animator now supports this on
Mac OS X. Just open the scene in the Scene panel, run your Syphon client (e.g., a live video application), and choose the Character Animator “Scene” as its frame source (Syphon server).
If you want to forego the live route and take some capture and edit your performance to a video, you can now render your scene and export it to any format using Adobe Media Encoder.
To export from Character Animator Preview 4, you’ll need to install the 2015.3 version of Adobe Media Encoder.
Making Your First Character
This in-depth tutorial shows a complete end-to-end workflow, from drawing the character all the way to a final export.
- Drawing a Head
- Importing & Setup
- Eyes & Eyebrows
- Mouth
- Physics
- Keyboard Triggers
- Cycle Layers
- Head Turns
- Drawing a Body
- Arms, Hands, Legs & Tails
- Live Animation
- Recording Setup & Lip Sync
- Recording Face, Limbs & Triggers
- Exporting
Building A Puppet From Scratch
Learn how to build a puppet in Photoshop from scratch and watch it come to life in Adobe Character Animator. This step-by-step guide shows how to create the head, eyes, nose, mouth, and body in a Photoshop PSD, and how to customize everything to get the quality of animation that you want. You’ll learn about when and why to mark something as « warp independently, » how head tracking and auto lip sync works, and why dragger and stick handles help you make bendable arms. You can follow these steps to make your own animated characters, or download the free example files to see how several complex characters were made.
Button Text